How to Record a Phone Call on Android [5 Proven Methods]
Learn how to record calls on Android using built-in tools, third-party apps, and Google Voice. Explore the best recording features for any Android phone.
Author: Abhilash Dama


Learn how to record calls on Android using built-in tools, third-party apps, and Google Voice. Explore the best recording features for any Android phone.
Author: Abhilash Dama
Ever ended a call and immediately wished you had a recording of it? Maybe someone shared a bank number, gave instructions too fast, or said something you needed to remember later.
Recording a phone call on Android device sounds simple, but it often isn’t. Depending on your phone model, Android version, and even where you live, the call recording option might be hidden, restricted, or missing entirely.
In this blog, I’ll share five best ways to record phone calls on Android using built-in settings, free apps and tools that can automatically record your calls. Whether you need to record a phone call occasionally or keep logs for personal and professional use, this blog will show you what works and how to do it right.
Most Android phones can record calls, but it depends on a few important things: the phone brand, your Android version, and regulations regarding call recording.
Some android smartphones like Samsung, OnePlus, and a few Xiaomi models come with a built-in call recording feature. If your phone supports it, the recording option usually appears on the call screen or inside your Phone app settings.
If you don’t see it, that doesn’t always mean your android phone doesn’t support it. Sometimes, the call recording feature is turned off by default and may be blocked due to legal restrictions in your country.
In places like India, automatic call recording is often allowed and enabled by default. But in the U.S. and Europe, privacy laws may limit or disable access to this feature. That’s why you might hear a “This call is being recorded” announcement. It’s required in some areas to let the other person know.
To check if your phone supports call recording:
If you can’t find that option, don’t worry. In the next sections, I’ll show you other ways to record calls on your Android device, even if your phone doesn’t have the feature built in.
Now that you know what your phone can or can’t do when it comes to recording calls, let’s look at five practical ways to get it done.
Some of these methods use built-in tools. Others rely on third-party call recording apps or external setups that work just as well, sometimes even better. I’ve included a mix of both so you can choose the method that fits your phone and your needs best.
Whether you are recording conversations or want a system that records a call automatically, you'll find a method here that works without any confusion.
If your Android device doesn’t offer built-in recording or you're looking for more advanced features, Qoli gives you a clean and powerful way to manage and record the calls automatically.
Unlike most call recording apps that just sit on your phone, Qoli works in the background and syncs everything to a secure dashboard you can access anytime. It's designed for people who need call history, voice recordings, and call logs all in one place.
1. Go to Qoli and sign up using your email address.
2. Choose a plan that fits your needs and activate it.
3. Once your plan is active, log in using your email and password.
4. Download the Qoli app and install it on the phone you want to record.
5. During setup, the app will request permissions like messages, contacts, location, and more.
6. Tap Allow for all permissions so Qoli can work properly.
7. After installation, return to Qoli.ai and log in to your account.
8.From your Qoli dashboard, you’ll be able to view call recordings, call logs, and call history in real-time.
If your phone already has a built-in call recorder, you won’t need to install any third-party apps, you can simply turn it on and start recording. This method is usually the easiest and most reliable when it's available.
Let’s walk through how to enable call recording and what to expect.
How to Use Built-in Call Recording:
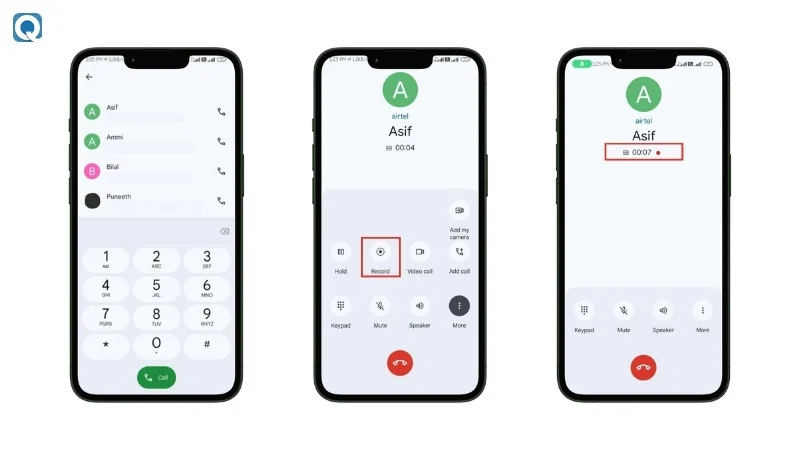
1. Open the Phone app
2. Start a call (or answer one)
3. Look for a “Record” button on the call screen. If available, just tap it to begin recording the call.
4. Some phones let you enable automatic call recording from the settings
5. You can often choose to record:
If you’re in the U.S., Google Voice offers a simple way to record incoming calls. You don’t need extra apps or a complex setup. It’s a good choice for those who don’t need constant recording but want a quick way to record a call once in a while. This is a convenient option.
Remember: This method only works for incoming calls, not outgoing ones.
How to Enable Google Voice Call Recording:
How to Record a Call Using Google Voice:
If you’re looking for an easy and flexible way to record phone conversations, using a Bluetooth headset with your Android phone is a great offline option. This method doesn’t rely on internet access or third-party apps, and it’s especially useful if you want to record only your side of the conversation, like during meetings, interviews, or personal notes.
Here’s how you can set it up and start recording clearly through your headset.
1. Connect Your Bluetooth Headset
Go to Settings > Bluetooth on your Android phone and make sure your headset is connected properly.
2. Choose a Recording App
You can use either a built-in app or a third-party call recorder. Some popular options include:
3. Set the Bluetooth Mic as the Input
Most apps will automatically switch to the Bluetooth mic once it’s connected. But double-check the app’s settings to be sure it’s using the headset instead of the phone’s mic.
4. Start Recording
Open the recorder app and hit the Record button. Speak through your Bluetooth headset to begin capturing audio.
5. Stop and Save the Recording
Once done, tap Stop and save your recording. You can play it back to check the recording quality, then store it or share it as needed.
If the other methods don’t work for your phone or you want better sound quality, using an external microphone or digital voice recorder is a good option. This method doesn’t depend on any app or phone settings, so it works on any Android phone, no matter the model or Android version.
It’s especially useful for interviews, podcast-style conversations, or recording calls for personal reference when both parties consent.
1. Put the Call on Speaker Mode
During the call, turn on the speaker so both sides of the conversation can be heard clearly.
2. Place Your Recording Device Nearby
Set your digital voice recorder, second phone, or any external mic close to the speaker. This helps capture both voices clearly.
3. Start and Stop the Recording Manually
Before the conversation begins, press record on your external device. When you're done, press stop to save the audio file. Most recorders store the file in formats like MP3 or WAV for easy access.
4. Save and Store Your Audio File
After recording the call, review the audio if needed. You can save it to your computer, upload it to Google Drive, or move it to any other storage of your choice.
Recording a call is easy. Getting clear, usable audio is the real challenge.If the recording is too quiet, has background noise, and only captures one side of the conversation, it won’t be helpful.
Whether you're using an app or an external recorder, a few small changes can greatly improve the quality of your phone call recordings.
1. Use Speaker Mode When Possible
If you’re using an external recorder or third-party app that captures audio through your phone’s mic, turning on speaker mode will help record both sides of the conversation more clearly.
2. Record in a Quiet Space
Avoid busy and noisy environments. Background sounds like fans, traffic, or people talking may interfere with the recording.
3. Use High-Quality Call Recording Apps Available
If you're not using the built-in call recording option, choose a reliable call recording app with good user reviews and settings that let you adjust audio format.
4. Keep Your Phone’s Microphone Clean
Sometimes the issue isn't the app but your phone itself. If there's dust near the mic, it can make the sound unclear. Gently clean the mic area using a soft cloth or small brush.
5. Test Before Important Calls
If the recording quality really matters, do a quick test before you make calls. Record a short call and play it back to check for clarity, echo, and delay.
Even if you’ve set everything up correctly, things might still go wrong. Sometimes the recording is silent, it only captures your voice, or it doesn’t save at all. These problems are common, but they can usually be fixed with a few simple steps.
Here’s how to troubleshoot call recording issues on your Android phone:
Once you record a call, the next big question is: where do those files actually go?
The location of your call recordings depends on the method and app that you use:
If your smartphone has a built-in call recorder, the saved recordings usually go to your File Manager. Here’s how to find them:
You’ll typically find files saved in .mp3 or .m4a format
If you're using Qoli, you don’t need to dig through folders. You can just:
Google Voice recordings aren’t stored locally on your phone. Instead:
If you're using the default Google Phone app to record calls, the files are saved in a protected location and accessed through the app itself:
Recording calls on an Android device can feel a little bit difficult, but it becomes easy once you know the right way. Whether you prefer using built-in tools, trusted apps like Qoli, or external devices, there’s a solution for every need. Just make sure to follow local laws governing call recording and test your setup in advance. From improving audio quality to finding where your recordings are saved, this blog has covered it all. Choose what works best for your device and never miss any important conversations again.